Important Note: please see most recent version of this documentation here.
You can use one or more of the following methods (all methods are listed starting with most high-level/easy-to-use to low-level/hard-to-use):
Important Note: please see most recent version of this documentation here.
EurekaLog options
EurekaLog options is the most simple way to affect on EurekaLog. They were specifically designed for that purpose. Most customizations can be done by using options.Static options
EurekaLog stores per-project configuration in options file for your project (it's .dproj/.cbproj for new Delphi/C++ Builder versions). Each time you build your project with EurekaLog - these options are inserted into final .exe file (or DLL). Then EurekaLog's code can use these options at run-time.Therefore, you can set options during design-time - and they will be accounted when application is run. In other words, EurekaLog project options works exactly as standard project options dialog.
To view/edit options - you must first open a project in your IDE. Then you should use "Project"/"EurekaLog options" menu command:
 |
| Opening EurekaLog options dialog for current project |
(You can also invoke this command if you don't have opened project, but then you'll edit default options for each new project).
The dialog itself is similar to project options dialog from Delphi/C++ Builder:
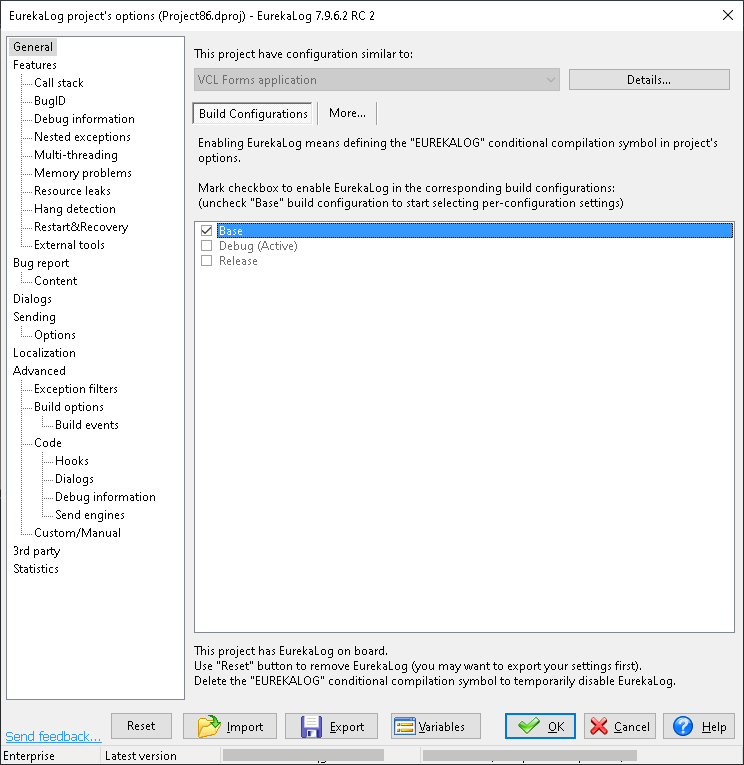 |
| EurekaLog project options dialog (click to enlarge/zoom in) |
You can see options categories on the left part (TreeView). Click on any category or sub-category to view and/or change options inside this category.
With this dialog you may change EurekaLog behaviour - to save bug report to disk or not, and where to save it, and what will be inside bug report, and should it be sent to you (as developer), and many other things.
Options are preset to fulfil common needs of developers. As you may guees, not always these "common needs" is what you specifically need in your own project. So we suggest you just to walk through options dialog to get yourself familiar with available options and alter them as you need. Each options has a detailed description in our help system. Yes, F1 works, if you've installed local help files during installation of EurekaLog (which is by default). But you may always visit our online help. Moreover, each option has short explanation in the hint. Just hover option's control with mouse cursor and wait a little:
 |
| Popup hint with explanation of the option under the mouse cursor (click image to enlarge/zoom in) |
Conclusion:
- + easy to use, no coding is necessary
- - options are static (i.e. set at design time)
Dynamic options
There are two additional features to mitigate "static" negative effect of options (see above).Variables
Environment variables are a set of dynamic named values that can affect the way running processes will behave on a computer. They can be said in some sense to create the operating environment in which a process runs. For example, an environment variable with a standard name can store the location that a particular computer system uses to store temporary files - this may vary from one computer system to another. A process which invokes the environment variable by (standard) name can be sure that it is storing temporary information in a directory that exists and is expected to have sufficient space.You can use environment variables in any text values in your project settings. You can insert variable by using "Variables" window. Variable is inserted as special tag. When you run your application at run-time, any variable value will be replaced with actual value, which is calculated at run-time.
For example, if you set your folder for saving bug-report to "%APPDATA%\MyBugReports" then your bug reports will be saved to
C:\Users\UserName\AppData\Roaming\MyBugReports\ or C:\Documents and Settings\UserName\Application Data\MyBugReports - depending on real value of %APPDATA% variable at run-time.Note: variables names are case-insensitive.
When you're in your EurekaLog project options (see above), you can click on "Variables" button at dialog's bottom:
| "Variables" button in EurekaLog project options (click to enlarge/zoom in) |
Click on this button and you will see such window:
 |
| "Variables" dialog |
"Copy" button will close the window with copying selected variable into clipboard. Alternatively: you can just double-click on variable in the list.
"Close" button will close the window without any action.
Suggested action's sequence:
- Open "Variables" window.
- Select variable that you want to use.
- Click "Copy" (or double-click variable). Dialog will be closed.
- Paste variable name from clipboard (
Ctrl + VorShift + Ins) to target setting's edit box.
Note: this dialog suggests you only build-in special pseudo-variables (those with names started with "_") and commonly used variables. However, you can use any environment variable (even if it's not listed in this dialog).
Note: you can also use relative file paths. For example, any path which starts with . (dot) will be relative to your current executable (regardless of actual current folder, which may be changed, say, by system open dialog). For example, "
.\BugReport.el" means file in the same folder as your executable.See more:
So, while variables is an easy way to add some dynamic behaviour to EurekaLog options, their powers are limited. There may be no variable for your specific need or it may be not applicable to desired options (such as checked/unchecked option kind).
Filters
Exception filter is a filter which can alter EurekaLog's behavior based on some properties of exception. It is a easy way to customize EurekaLog on per-exception basis without writing code.Usually exceptions are identified by exception's class name (such as 'Exception', 'EAccessViolation', 'EStreamReadError', etc.). You can also identify exception by source location. And you can identify exception by its type (handled or unhandled). Once exception is identified - you can change handler for it (none, RTL or EurekaLog), dialog class (to any of existing dialog classes), override error message or set action (restart or terminate). Remember, that you can also use environment variables.
Exception filters are applied before processing exception. Filters are applied in order from top to bottom. First matched filter is applied.
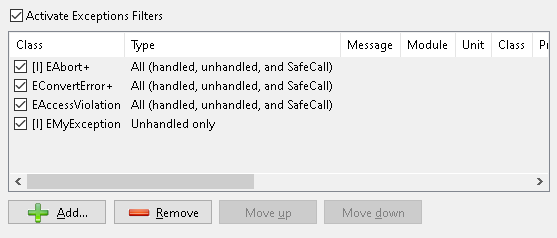 |
| Example of 3 exceptions filters added to options |
Most typical usage for exceptions filters include:
- Completely ignore particular exception type. This is useful for such exceptions as
EAbort. You may use similar exception types in your code, so now you can use exception filters feature to completely hide such exceptions. Set handler to "none". No error dialog will be shown. No bug report will be created. - Excluding certain exceptions from EurekaLog's processing. For example, when disk free space is low and you try to create or write a file - an exception about insufficient disk space will be raised. You usually want this exception to be shown as error to the end user (so he/she can free some disk space and retry the operation), rather than generating bug report (and optionally sending it to you). That's because this exception is not a bug in your code, there is nothing to fix. So you may create filter for such exceptions (they are called "expected" exceptions). Set handler to RTL, and this exception will be handled as usual (by showing error message), but no EurekaLog work will be done for it (no EurekaLog error dialog, no bug reports, etc.).
- Some exceptions (such as access violation) are low-level. Their message contains some technical information, but it's completely useless for most users (which are not programmers). Seeing such "cryptic" error messages may be confusing ("gosh, what should I do with it? Is it even a error? Or it asks me something that I don't understand?"), so it may be useful to hide them. It's better to show more user-friendly message like "Sorry, there was a error in application. Please, let us know about this problem and restart application." Such message is far more descriptive. It explains what happenned (an error) and what to do (report to developers and restart application). You may create exception filters for such exceptions, set handler to "EurekaLog" and override a error message. You may additionally enable termination/restart features for these exceptions. Note: message override affects only error message in visual dialogs. Bug reports always contain information about original exception (with original error message).
Note: exceptions filter can also be created from code (see below).
Coding
While the above methods do not require writing code and provide some degree of dynamic changes at run-time, they are still limited and not suitable for custom, not common cases. So, when you have specific need that can't be satisfied by the above - then you'll have to write some code.Changing options at run-time
One of the simplest customizations is changing EurekaLog options from the code.ExceptionLog7 unit declares global function CurrentEurekaLogOptions. This function returns TEurekaModuleOptions class (which is declared in EClasses unit), which contains properties corresponding to EurekaLog's options. I.e. almost each property (that you can change in EurekaLog project options dialog) is presented as property in TEurekaModuleOptions class. For example, you may write a program which is able to work either as Win32 service or as GUI front end - depending on the way it was launched. You probably want to have differnt bug reports for each of this mode. And Win32 service can't have visual error dialogs. Obviosly, this can't be solved by setting options at design-time, since trigger event happens at run-time. So, you setup common options at design time and write such code, which sets the differences:
uses
  ETypes, EClasses, ExceptionLog7;

...

initialization

  if IsWin32Service then
  begin
    CurrentEurekaLogOptions.OutputPath := '%APPDATA%\MySoftware\Win32Service\';
    CurrentEurekaLogOptions.ExceptionDialogType := edtService;
  end
  else
  begin
    CurrentEurekaLogOptions.OutputPath := '%APPDATA%\MySoftware\GUIFrontEnd\';
    CurrentEurekaLogOptions.ExceptionDialogType := edtMSClassic;
  end;

end.
Note: some options (such as build options) affects compilation stage. Thus, they can't be changed at run-time when file was already compiled.
Note: some options (such as leaks control) requires special rules for setting up. That's why they are controled with other means, not with options class. However, 90% of options can be freely changed via this class.
Note: needless to say that you may use environment variables and exception filters from code too. You can alter exception filters via
CurrentEurekaLogOptions.ExceptionsFilters property.CurrentEurekaLogOptions is a global function which contains default options for your application in run-time. It affects all exceptions and all threads. Typically, you alter these options at startup (either in initialization section of some unit or in begin/end of .dpr file). Often there is need to alter option only for some exceptions. EurekaLog provides additional feature for this: events and event hanlders.
Custom attributes
New Delphi and C++ Builder IDEs offer extented RTTI with support of custom attributes. EurekaLog is able to use custom attributes to alter behaviour for exception types. This is similar to exception filters. Using exception filters is simple, but sometimes it's not very convenient. So, instead you can define EurekaLog behaviour right when you declare exception classes (this code will be ignored if there is no EurekaLog installed).Custom attributes are declared in
EClasses unit. The following attributes are declared:
type
  EurekaLogHandler = class(TCustomAttribute)
  strict private
    FHandler: TFilterHandlerType;
  public
    constructor Create(Value: TFilterHandlerType);
    property Handler: TFilterHandlerType read FHandler;
  end;

  EurekaLogMessage = class(TCustomAttribute)
  strict private
    FMessage: String;
  public
    constructor Create(Value: String);
    property Message: String read FMessage;
  end;

  EurekaLogAction = class(TCustomAttribute)
  strict private
    FAction: TFilterActionType;
  public
    constructor Create(Value: TFilterActionType);
    property Action: TFilterActionType read FAction;
  end;

  EurekaLogDialog = class(TCustomAttribute)
  strict private
    FDialog: TExceptionDialogType;
  public
    constructor Create(Value: TExceptionDialogType);
    property Dialog: TExceptionDialogType read FDialog;
  end;
Here is a sample on how to use them:
type
  // ETestException will be ignored by EurekaLog and it always will be handled by your application
  [EurekaLogHandler(fhtRTL)]
  ETestException = class(Exception);

  // Exception message will be replaced
  [EurekaLogMessage('Sorry, there was an error.')]
  ECustomMessage = class(Exception);

  // Switch dialog to EurekaLog-Detailed style
  [EurekaLogDialog(edtEurekaLogDetailed)]
  EDialogException = class(Exception);
You get the idea - when you declare exception type, you can add attributes to it. Each attribute will modify EurekaLog behaviour for exceptions of this class only. This works the same as exception filters (actually, internally custom attributes just creates new filter rule).To learn more about custom attributes - visit RAD Studio help.
Events
EurekaLog's event is similar to standard Delphi/C++ Builder events, such as OnClick for TButton. Event handler is callback procedure or method, which you regiter for some event. EurekaLog will call your event handler (i.e. your code) each time this event occurs. There are many events available. Most commonly used areOnExceptionNotify and OnExceptionAction.Note: each event handler is declared as both method or procedure. You can use either option, there is no difference between method and procedure, so you can use whatever you want.
There are two ways of registering your code as event handler. The most simple way is to use
TEurekaLogV7 component. This component is similar to standard TApplicationEvents component. Just drop it on the form and assign handlers by using "Events" page in Object Inspector: |
TEurekaLogV7 component on the form and one event hanlder assigned |
While this is very simple way, you should be awared that your event handlers will be registered as long as host form lives. Thus, your event handler will not be invoked for events during initialization/finalization of your application. For this reason:
- While there is no limitation on
TEurekaLogV7components in one application and no restrictions on the form (it can be main form and any child/auxilary form), we recommend to use main form as host forTEurekaLogV7component whenever possible. - We recommend using component only for such events that depends on your host form. For example, event hanlder may add currently opened document to bug report. Such event handler is best registered with component. We don't recommend using component for more generic event handlers. Use code registration (see below).
Note: registering event handler via component will create/use event handler as method of the object (i.e. form), not as callback procedure.
Second method to register event handler is to call RegisterEventName function, where Name is a name of event. For example, you may use such code:
unit Unit1;

interface

...

implmenetation

uses
  EEvents;

// Some your routine to add a message to application log
procedure AddToLog(const AMessage: String);
begin
  ...
end;

// Your handler for OnExceptionNotify event
procedure MyHandler(const ACustom: Pointer; AExceptionInfo: TEurekaExceptionInfo; var AHandle: Boolean; var ACallNextHandler: Boolean);
begin
  if AExceptionInfo.ExceptionClass = 'EMyException' then
  begin
    AddToLog(AExceptionInfo.CallStack.ToString);
    AHandle := False;
  end;
end;

initialization

  RegisterEventExceptionNotify(nil, MyHandler);

end.
This sample event handler will log call stack of each exception of EMyException type, and it will disable EurekaLog's processing for these exceptions.As you can see - you need to write all code by yourself (i.e. handler registration and procedure header/prototype). All events are declared in
EEvents unit.Note: you may unregister registered event handler by using UnregisterEventName function, but it's not required.
That's almost all for events and event hanlders, but we must discuss one more important thing. Once exception is raised, EurekaLog options are captured from
CurrentEurekaLogOptions function. Each exception is accompanied by TEurekaExceptionInfo class, which contains property and options for each exception. Further changes in CurrentEurekaLogOptions will not affect already raised exceptions. Threfore, your changes of CurrentEurekaLogOptions inside any event handler for exceptions will have no effect for current exception. It will affect only future exceptions. To change options of current exceptions - use Options property of TEurekaExceptionInfo class. For example:
unit Unit1;

interface

...

implmenetation

uses
  EEvents;

// Your handler for OnExceptionNotify event
procedure MyHandler(const ACustom: Pointer; AExceptionInfo: TEurekaExceptionInfo; var AHandle: Boolean; var ACallNextHandler: Boolean);
begin
  // The same as exception filter for EMyException which changes dialog to "EurekaLog" style
  if AExceptionInfo.ExceptionClass = 'EMyException' then
    AExceptionInfo.Options.ExceptionDialogType := edtEurekaLog;
end;

initialization

  RegisterEventExceptionNotify(nil, MyHandler);

end.
The similar concern is applied for many other objects in EurekaLog. Such as dialogs, send engines, log report builders, call stack classes, etc. They all have
Options property, which is captured from their "parent" or CurrentEurekaLogOptions if there is no "parent".To summarize:
- Event hanlders offer you unlimited ability for customizing EurekaLog, but only within certain points of interest (i.e. events). You can't alter whole processing logic by using only event handlers.
Subclassing
When event handlers are not enough, you need to override parts of EurekaLog's code to fulfil your needs. For example, if you want to alter icon in error dialogs or replace dialog as whole, if you want to change processing (exchange order of saving bug report and sending it), etc. or if you want to extend EurekaLog (like add new dialog or new send method) - then you can't use event handlers, because there is no event for that. But what you can do is to replace or extend EurekaLog's code with your own.High level code of EurekaLog is done as classes. Therefore, if you need to alter minor point in EurekaLog (adjust it a little), then you may create your own class as child class to standard EurekaLog class, override some virtual method, write your own bevahior code, call inherited method to get standard behaviour, and so on. I.e. the usual things that you may do with tree of classes. Or you may write your own class completely from scratch (inheriting from base abstract class).
Note: please note that (unlike events) EurekaLog classes are constantly evolving. There are new methods and features introduced as time passes. Therefore your code that uses subclassing may need to be adjusted for new EurekaLog versions.
For that reason classes are described much less in documentation than other methods. Because they are used much rarely and changes more often. To study what you can do with classes you will have to read interface sections of units with declaration of classes. There you can see class inheritance, interesting methods to override, etc. You can do this even in EurekaLog's editions without full source code. We provide headers for your reference.
The common rule is: if class can be only one (like log builder class), then class type is registered via global class variable. All you have to do is to write your own class and assign it to variable during initialization. Otherwise, if there may be various classes (like dialogs or send engines), then you have to create your own class, register it in global list via various RegisterSomething functions (they are declared in the same place as base abstract classes), and switch EurekaLog to use your class via options.
Let's see some code examples to make things clear.
Example #1: replacing dialog icon.
EurekaLog offers you feature to use generic error icon or icon of your application for error dialogs. However, you may want to use some other icon for that. There is no such feature in EurekaLog, but you can easily fix that with such code:
unit Unit1;

interface

// ...

implementation

uses
  EBase, ECore, EModules, EListView, EDialog, EDialogWinAPIMSClassic;

{$R *.dfm}

// To test our customization code
procedure TForm1.Button1Click(Sender: TObject);
begin
  raise Exception.Create('Error Message');
end;

type
  // Our child class - inheriting from standard TMSClassicDialog
  TMSClassicDialogCustom = class(TMSClassicDialog)
  private
    FCustomIcon: HBITMAP; // our new icon
  protected
    // Init/done:
    procedure WindowInit; override;
    procedure WindowDone; override;
    // Replacing icon drawing:
    function Paint(const ADC: HDC; const ARect: TRect): Integer; override;
  end;

{ TMSClassicDialogCustom }

procedure TMSClassicDialogCustom.WindowInit;
var
  Ico: HIcon;
begin
  inherited;

  Ico := LoadIcon(HInstance, 'CUSTOMICON');
  FCustomIcon := IcoToBmp(Ico, GetStockObject(WHITE_BRUSH), 32, 32);
end;

function TMSClassicDialogCustom.Paint(const ADC: HDC; const ARect: TRect): Integer;
begin
  Result := inherited;
  DrawBmp(ADC, FCustomIcon, MonitorLeft, MonitorTop, 32, 32);
end;

procedure TMSClassicDialogCustom.WindowDone;
begin
  DeleteObject(FCustomIcon);
  inherited;
end;

initialization

  if IsEurekaLogInstalled then
  begin
    // You have to register dialog before using it:
    RegisterDialogClass(TMSClassicDialogCustom);
    // Once registered - now you can use it in options:
    CurrentEurekaLogOptions.ExceptionDialogType := TMSClassicDialogCustom.ClassName;
  end;

end.
Obviosly, this code replaces icon for one particular dialog type (MS Classic style). If you want to alter icon for several classes, then you have to write more your own child classes.Example #2: replacing content of bug reports.
Recently we got a request from a customer. They use their own system to collect and sort bug reports generated by EurekaLog. Previosly they worked with EurekaLog 6, but then upgraded to EurekaLog 7. Bug reports from EurekaLog 7 has slightly different structure than reports from EurekaLog 6 (new fields and columns). Therefore, new format of bug report file breaks their old code. Of course, they can update/improve their code or... switch EurekaLog to produce bug reports in old format. This can also be useful if you're migrating to EurekaLog from other exception tracers solutions (such as JCLDebug/JCLHookExcept, madExcept or Exception Magic). You can force EurekaLog to generate bug report in the format of your previous solution, so you won't have to re-write other code. Obviosly, there is no such build-in feature in EurekaLog.
Here is a simple code that creates bug report in format of EurekaLog 6:
uses
  EConsts, ETypes, EClasses, ECallStack, EException, EEvents, ELogBuilder;

type
  // EurekaLog 6 format will be altered from default EurekaLog 7 format,
  // that's why we inherit from EurekaLog 7 builder class and
  // replace only some methods
  TEurekaLog6Builder = class(TLogBuilder)
  public
    function CreateGeneralText: String; override;
    function CreateCallStackText: String; override;
  end;

{ TEurekaLog6Builder }

// Replace header of the bug report (to change "7" to "6" in header)
function TEurekaLog6Builder.CreateGeneralText: String;
begin
  Result := inherited;
  Result := 'EurekaLog 6' + Copy(Result, Pos(sLineBreak, Result), MaxInt);
end;

// Replace call stack (remove new columns)
function TEurekaLog6Builder.CreateCallStackText: String;
var
  Stack: TEurekaCallStack;
  Formatter: TEurekaBaseStackFormatter;
begin
  Stack := nil;
  try
    if CallStack <> nil then
    begin
      Stack := TEurekaCallStack.Create;

      Stack.Assign(CallStack);

      Stack.Formatter.Assign(Options);
      Stack.Formatter.CaptionHeader := Options.CustomizedExpandedTexts[mtDialog_CallStackHeader] + EHeaderSuffix;
    end;

    Formatter := TEurekaStackFormatterV6.Create;
    try
      Formatter.Assign(Options);
      Formatter.CaptionHeader := Options.CustomizedExpandedTexts[mtDialog_CallStackHeader] + EHeaderSuffix;

      Result := CallStackToString(Stack, Options.CustomizedExpandedTexts[mtDialog_CallStackHeader] + EHeaderSuffix, Formatter);
    finally
      FreeAndNil(Formatter);
    end;
  finally
    FreeAndNil(Stack);
  end;
end;

// Rename .el files to old .elf files
procedure CustomizeFileNames(const ACustom: Pointer; AExceptionInfo: TEurekaExceptionInfo; const AFileType: TEurekaLogFileType; var AFileName: String; var ACallNextHandler: Boolean);
begin
  if AnsiLowerCase(ExtractFileExt(AFileName)) = '.el' then
    AFileName := ChangeFileExt(AFileName, '.elf');
end;

initialization

  // Register bug report builder:
  LogBuilderClass := TEurekaLog6Builder;

  // Register event handler for file names:
  RegisterEventCustomFileName(nil, CustomizeFileNames);

end.
This sample uses a combination of custom class and event handler to reach the desired goal.Example #3: override original class.
Suppose that you want to alter original behaviour/class, but don't want to create a new class (with new name), because this will require you to alter options as well. Instead, you want just to set up options at design time and provide altered behaviour at run-time.
For example, when you post bug to Mantis, a issue title is composed. EurekaLog does not provide way to alter it, because it's used to identify tickets. You may want to alter it (say, by appending more info, so title becomes more descriptive). Here is how you can do that:
uses
  EConsts,
  ESend,
  ESendAPIMantis;

type
  // Trick: use the same class name as original class
  // You'll have to append unit name to class ident to avoid compiler confusion
  TELTrackerMantisSender = class(ESendAPIMantis.TELTrackerMantisSender)
  protected
    function ComposeTitle: String; override;
  end;

// This is a default implementation of the method,
// you can replace it with arbitrary code
function TELTrackerMantisSender.ComposeTitle: String;
begin
  if BugAppVersion <> '' then
    Result := Format('%s (Bug %s; v%s)', [BugType, BugID, BugAppVersion])
  else
    Result := Format('%s (Bug %s)', [BugType, BugID]);
  Log(Format('Title = ''%s''', [Result]));
end;

initialization

  // Register send class to be the first in the list.
  // Default class (by EurekaLog) will be listed later.
  // Any search for class by name will find our class, because it's listed first
  RegisterSenderFirst(TELTrackerMantisSender);

end.
With this trick you don't have to change options. You can just set options at design-time. The important part here is to register your class first, which is archived by using registering function with "First" suffix.Note: please note that this is not recommended way to work with tickets in Mantis. We suggest you to create custom fields for your project (Mantis configuration). Fill custom fields with information (EurekaLog configuration). And show some of these fields in list of tickets (Mantis configuration). That way you will archive the desired effect (to see more info about each ticket in list), but also additionally gain some benefits: you will be able to sort/filter by custom fields, you will not break default EurekaLog tickets identification.
Example #4: a custom dialog.
You may be not satisfied by standard EurekaLog dialogs, so you may want to use your own dialog. Here is what you need to do: create class inheriting from abstract
TBaseDialog class (EDialog unit), register it, and set ExceptionDialogType option. This example is similar to example #1. But this time we create dialog from scratch, we're not using ready classes.The following sample shows four new dialog classes. Actually, this is just a code from EurekaLog itself, but it's short and simple to illustrate the point:
uses
  EDialog, EClasses, ETypes;

type
  // "Empty" dialog that does nothing at all
  TNullDialog = class(TBaseDialog)
  protected
    procedure Beep; override;
    function ShowModalInternal: TResponse; override;
  public
    class function ThreadSafe: Boolean; override;
  end;

  // MessageBox dialog
  TMessageBoxDialog = class(TBaseDialog)
  protected
    function ShowModalInternal: TResponse; override;
    procedure Beep; override;
  public
    class function ThreadSafe: Boolean; override;
  end;

  // A variant of MessageBox with more detailed message (with call stack)
  TMessageBoxDetailedDialog = class(TMessageBoxDialog)
  protected
    function ExceptionMessage: String; override;
  end;

  // "Default" dialog - dialog that invokes standard dialog (non-EurekaLog)
  TRTLHandlerDialog = class(TBaseDialog)
  protected
    procedure Beep; override;
    function GetCallRTLExceptionEvent: Boolean; override;
    function ShowModalInternal: TResponse; override;
  end;

{ TNullDialog }

procedure TNullDialog.Beep;
begin
  // does nothing - no beep needed
end;

// Main method: do nothing, return success
function TNullDialog.ShowModalInternal: TResponse;
begin
  SetReproduceText(ReproduceText);

  Result.SendResult := srSent;
  Result.ErrorCode := ERROR_SUCCESS;
  Result.ErrorMessage := '';
end;

// Indicate that we can be called from any thread (this should be False for VCL/CLX/FMX dialogs)
class function TNullDialog.ThreadSafe: Boolean;
begin
  Result := True;
end;

{ TMessageBoxDialog }

procedure TMessageBoxDialog.Beep;
begin
  // does nothing - beep is invoked by Windows.MessageBox in TMessageBoxDialog.ShowModalInternal
end;

// Main method
function TMessageBoxDialog.ShowModalInternal: TResponse;
var
  Flags: Cardinal;
  Msg: String;
begin
  // Set default result
  Result.ErrorCode := ERROR_SUCCESS;
  Result.ErrorMessage := '';
  if SendErrorReportChecked then
    Result.SendResult := srSent
  else
    Result.SendResult := srCancelled;

  // Prepare message to show
  Msg := ExceptionMessage;
  if ShowSendErrorControl then
  begin
    Msg := Format(Options.CustomizedExpandedTexts[mtSend_AskSend], [Msg]);
    Flags := MB_YESNO;
  end
  else
    Flags := MB_OK;
  Flags := Flags or MB_ICONERROR or MB_TASKMODAL;
  if SendErrorReportChecked or (not ShowSendErrorControl) then
    Flags := Flags or MB_DEFBUTTON1
  else
    Flags := Flags or MB_DEFBUTTON2;

  // Call actual MessageBox and set result
  case MessageBox(Msg,
                  Options.CustomizedExpandedTexts[mtDialog_Caption],
                  Flags) of
    0: Result.ErrorCode := GetLastError;
    IDYes:
       Result.SendResult := srSent;
    IDNo:
       Result.SendResult := srCancelled;
  end;

  // Save error code/error message for failures
  if Result.ErrorCode <> ERROR_SUCCESS then
  begin
    Result.SendResult := srUnknownError;
    Result.ErrorMessage := SysErrorMessage(Result.ErrorCode);
  end
  else
    SetReproduceText(ReproduceText);
end;

// Can be called from any thread
class function TMessageBoxDialog.ThreadSafe: Boolean;
begin
  Result := True;
end;

{ TRTLHandlerDialog }

// Indicate desire to invoke RTL handler
function TRTLHandlerDialog.GetCallRTLExceptionEvent: Boolean;
begin
  Result := True;
end;

function TRTLHandlerDialog.ShowModalInternal: TResponse;
begin
  SetReproduceText(ReproduceText);

  Result.SendResult := srRestart;  // means "call RTL handler"
  Result.ErrorCode := ERROR_SUCCESS;
  Result.ErrorMessage := '';
end;

procedure TRTLHandlerDialog.Beep;
begin
  // Does nothing - transfer work to RTL handler
end;

{ TMessageBoxDetailedDialog }

// This one is a bit more complex - we want to add call stack to error message.
// However, default form is not very readable with variable-width fonts.
// That's why first we need a way to format call stack in another way.

type
  // Our new formatter
  TMessageBoxDetailedFormatter = class(TEurekaBaseStackFormatter)
  protected
    function GetItemText(const AIndex: Integer): String; override;
    function GetStrings: TStrings; override;
  end;

// Forms one line of call stack
function TMessageBoxDetailedFormatter.GetItemText(const AIndex: Integer): String;
var
  Cache: TEurekaDebugInfo;
  Info: PEurekaDebugInfo;
  ModuleName, UnitName, RoutineName, LineInfo: String;
begin
  Info := CallStack.GetItem(AIndex, Cache);

  ModuleName := ExtractFileName(Info^.Location.ModuleName);
  UnitName := Info^.Location.UnitName;

  if UnitName = ChangeFileExt(ModuleName, '') then
    UnitName := ''
  else
    UnitName := '.' + UnitName;

  RoutineName := CallStack.ComposeName(Info^.Location.ClassName, Info^.Location.ProcedureName);
  if RoutineName <> '' then
    RoutineName := '.' + RoutineName;

  if Info^.Location.LineNumber > 0 then
    LineInfo := Format(',%d[%d]', [Info^.Location.LineNumber, Info^.Location.ProcOffsetLine]) // Do Not Localize
  else
    LineInfo := '';

  Result := ModuleName + UnitName + RoutineName + LineInfo;
end;

// Formats entire call stack
function TMessageBoxDetailedFormatter.GetStrings: TStrings;
var
  ThreadID: Cardinal;
  I: Integer;
  Line: String;
  Stack: TEurekaBaseStackList;
begin
  if not Assigned(FStr) then
  begin
    FStr := TStringList.Create;
    FModified := True;
  end;
  if FModified then
  begin
    Stack := CallStack;
    CalculateLengths;
    FStr.BeginUpdate;
    try
      FStr.Clear;
      FStr.Capacity := Stack.Count;

      if Stack.Count > 0 then
      begin
        ThreadID := Stack.Items[0].ThreadID;
        for I := 0 to Stack.Count - 1 do
        begin
          if (Stack.Items[I].Location.Module <> 0) and
             (Stack.Items[I].Location.DebugDetail in [ddUnit..ddSourceCode]) and
             (Stack.Items[I].ThreadID = ThreadID) then
          begin
            Line := GetItemText(I);
            if (FStr.Count <= 0) or (FStr[FStr.Count - 1] <> Line) then
              FStr.Add(Line);
          end;
        end;
      end;
    finally
      FStr.EndUpdate;
    end;
    FModified := False;
  end;
  Result := FStr;
end;

// Append call stack to error message
function TMessageBoxDetailedDialog.ExceptionMessage: String;
const
  MaxLines = 15;
var
  Formatter: TMessageBoxDetailedFormatter;
  Stack: TEurekaBaseStackList;
begin
  {$WARNINGS OFF}
  // Abstract methods are intended here. It is like assert: they should not be called.
  Formatter := TMessageBoxDetailedFormatter.Create;
  {$WARNINGS ON}
  try

    if Assigned(CallStack) then
      Formatter.Assign(CallStack.Formatter);
    Formatter.CaptionHeader := '';

    Stack := nil;
    try
      if CallStack <> nil then
      begin
        Stack := TEurekaStackList.Create;
        Stack.Assign(CallStack);
        while Stack.Count > MaxLines do
          Stack.Delete(Stack.Count - 1);
      end;
      Result := inherited ExceptionMessage + sLineBreak + sLineBreak +
                CallStackToString(Stack, '', Formatter);
    finally
      FreeAndNil(Stack);
    end;
  finally
    FreeAndNil(Formatter);
  end;
end;
As you can see, the central method here is ShowModalInternal. It does all the work. It's abstract and must be overwritten in child classes. All other methods of TBaseDialog are virtual, but not abstract. They contain default behaviour. You can override them to alter behaviour, but you don't have to. Base dialog class contains large number of helpers (methods and properties). All that dialog needs to do is to invoke these methods in right order. Therefore any child class can use powerful tools to quickly build new dialog.Note: there is another abtract dialog class -
TWinAPIDialog from EDialogWinAPI unit. It's useful if you want to create new dialog based on direct WinAPI calls, rather than using ready functions or frameworks (VCL/CLX/FMX).Important note: dialog class is responsible for almost whole exception processing. That's because "dialog" don't have to be visual. Think about Win32 service, system log, WER (Windows Error Reporting), etc. So, this is not always possible to distinguish between "error dialog" and "exception processing". That's why these concepts are both controlled by single "dialog" class. As we saw above, a major method for visual dialog is
ShowModalInternal method. But real entry point is Execute method. Default implementation goes like this:
function TBaseDialog.Execute: TResponse;
var
  CanSaveReport: Boolean;
begin
  try
    SaveCurrentEnvironment;
    try
      // Preparation
      SetupFileNames;
      FDuplicate := CalcDuplicatedException(FCanSend);

      // Saving bug report
      if not Restarted then
      begin
        SetReproduceText('');
        if DeleteLogAtVersionChange then
          DeleteOldLog;
        MakeScreenshot;
        AddCustomData;
        if PresaveReport and SaveLogFile then
          SaveBugReport; // Pre-save to get log in case of crash in dialog
        Beep;
      end
      else
        FSaved := (PresaveReport and SaveLogFile);

      // Actually visible part:
      Result := ShowModal; // invokes ShowModalInternal with events and error handling

      // Restart dialog?
      // E.g. User clicked on "see more" link,
      // so we need to change MSClassic -> EurekaLogDetailed
      if Result.SendResult = srRestart then
        Exit;

      // Save bug report
      CanSaveReport := SaveLogFile and
                       (
                         Succeeded(Ord(Result.SendResult)) or
                         (Result.SendResult = srCancelled) or
                         (not PresaveReport)
                       );
      if CanSaveReport then
        SaveBugReport; // Re-save to update changed fields (like reproduce text)

      if Succeeded(Ord(Result.SendResult)) and CanSend then
      begin
        PrepareFilesForSend;

        Result := SendBugReport;

        if Failed(Ord(Result.SendResult)) then
        begin
          if CopyLogInCaseOfError then
            CopyReportToClipboard;
          if SaveCompressedCopyInCaseOfError then
            SavePackedCopy;
        end
        else
        if DeleteLogAfterSuccessfulSend then
          DeleteCurrentLog;

        ShowSendResult(Result);
        if CanSaveReport then
          UpdateSendInformationInLog(Result.SendResult);
      end
      else
      begin
        DoEventExceptionAction(ExceptionInfo, atSendCancelled);
        if CanSaveReport then
          UpdateSendInformationInLog(srCancelled);
      end;

    finally
      RestoreCurrentEnvironment;
    end;

    CheckTermination;
    if Options.CustomFieldBool[difTerminateApplication] then
      TerminateApplication;
  except
    on E: Exception do
    begin
      Result.ErrorCode := ERROR_GEN_FAILURE;
      Result.ErrorMessage := E.Message;
      Result.SendResult := srUnknownError;
    end;
  end;
end;
As you can see, there is the whole processing of exceptions: saving bug report, displaying dialog, updating bug report with new values (e-mail/steps to reproduce), sending report, restarting application. You rarely need to alter this method, rather you will override methods which are called by it. This method is shown here just to illustrate the point that dialog controls more than just visual behaviour.As final words on subclassing - here is the list of classes, units and functions for this (as of EurekaLog 7.0.02):
- Base dialog class:
EDialog.TBaseDialog. - Dialog class registration:
EDialog.RegisterDialogClass. - Base send engine class:
ESend.TELUniversalSender. - Send engine class registration:
ESend.RegisterSender. - Base debug information provider class:
EClasses.TELDebugInfoSource. - Debug information provider registration:
EDebugInfo.RegisterDebugInfoSource. - Base call stack class:
ECallStack.TEurekaBaseStackList. - Default call stack class:
ECallStack.EurekaCallStackClass. - Specific call stack classes:
ECallStack.TracerMethodsClasses. - Base log builder class:
ELogBuilder.TBaseLogBuilder. - Default log builder class:
ELogBuilder.LogBuilderClass. - Base hung detection thread class:
EFreeze.TFreezeThread. - Default hung detection thread class:
EFreeze.FreezeThreadClass.
Low-level handlers
Classes are used by high level code in EurekaLog. Sometimes customizations of high level code is not enough. Luckily, EurekaLog 7 offers you a way to change almost anything. Low level points for customizations are presented by global variables of procedural types. These procedural variables are invoked by EurekaLog, and it points to EurekaLog code by default. You may write your own code and write pointer to it into these variables.Note: these global variables are not documented and never will be. You can use them on your own risk.
Here is the list of available low-level customization possibilities:
EInjectunit:EventUnhandledExceptionFilterEventExceptProcEventExceptClsProcEventExceptObjProcEventRaiseExceptionProcEventGetExceptionStackInfoProcEventGetStackInfoStringProcEventCleanUpStackInfoProcEventExceptionDispatcherEventIndyThreadHandleException
EExceptionHookunit:_IsUnexpected
- ELowLevel unit:
_InitDoneErrorHandler_SafeExecLog_ConsoleLogger
EHook._GetSymbolAddrEBaseunit:_InternalError_RaiseExpected_OnPanic
EAppTypeunit:_CustomMessageBox_GetMainWnd
- Almost all routines in
EMemLeaksandEResLeaksunits. EThreadsManagerunit:_GetRealAddresses
The most important thing about low level handlers is that the initialization order is important. It's highly not recomended to alter these variables during actual work of your application. You should modify handlers only during initialization/finalization process. It's also strictly recommended to save previous handler before installing your own handler and revert it back (uninstall) on finalization.
Modifying code of EurekaLog itself
When nothing else helps - you can alter source code of EurekaLog. Of course, it's possible only if you have edition with full source code (all other methods of customizations listed above are applicable for any edition of EurekaLog).You can alter EurekaLog code to absolutely every behavior that you want. Then you need to recompile it for these changes to take effect. See also: how to recompile EurekaLog.
Please note that any upgrading or reinstalling EurekaLog will overwrite EurekaLog files, thus your customizations will be lost (unless you made a backup). You'll have to re-implement all customizations each time you upgrade EurekaLog. For this reason use this method as last resort measure only. Prefer the above discussed methods whenever possible. If you still has to modify EurekaLog sources - please, let us know why you do that. We can add your customizations in EurekaLog, so you won't need to re-insert them into source code each time you upgrade (of course, this is only possible if your customizations has some value for other developers).